DiscworldMUD-TinTin
A collection of configurations and scripts for use with DiscworldMUD in the TinTin++ MUD client.
Created by Ruhsbaar of the Venerable Council of Seers.
Majorly updated in 2026 to work with latest TinTin++ versions (2.02.60 and beyond) and account for latest MUD features.
High-level feature list (not exhaustive):
- Chat window to capture tells/group say/talkers
- Speedwalk generation and room/npc/item searching via Quow's database
- Map door text parsing and ranking similar to Quow's
- Hotspot timers for hunting (sync to other users, report to group)
- Mindspace and spellcheck calculations (similar to Quow's)
- Group shields monitor
- Mission timers (sailing, sausage, am job market, dead letters)
- Hundreds of triggers and color highlights for sailing, combat, magic, and others
- Plenty more...
Table of Contents
- Introduction / Overview
- Installation and Setup
- Features
- Tmux Setup
- Mouse Support
- Command Reference
- Credits
- Disclaimer
Introduction / Overview
This tintin++ setup has been crafted by me with love over the last ten years and has a wide array of features and functionality relating to many activities on DiscworldMUD. Many of the best features from Quow's excellent MUSHClient setup have been "converted" to work in TinTin++ so I could go back to my favourite client and be at home in my terminal window.
Many features create output-files meant to be displayed in their own "mini window" for which I make liberal use of Tmux panes to display information alongside the standard TinTin++ window.
For reference I host this configuration on a Linux VPS and thus am able to "take over" the Tmux session as I move between devices (desktop, phone, laptop, work) without having to disconnect/reconnect to the MUD itself. This may help to explain some of the decisions made with the setup. That said it will work perfectly fine on your local computer.
TODO Update screenshot

Installation and Setup
A short guide to getting the client installed, this package put in place and MUD options properly configured.
Installing the Package
1. Install TinTin++ 2.02.60 or Later
- Your distribution may have TT++ in its package manager, but ensure you are getting at least v2.01.92, ideally v2.02.60 or later.
- I recommend building TinTin++ from source
- Requirements for build:
- pcre2 (libpcre2-dev or similar)
- zlib (zlib1g-dev or similar)
- gnutls (libgnutls30-dev or similar)
- See the offical TinTin++ installation instructions for a complete guide
- Once you can type "tt++" into your shell and launch the TinTin++ client this step is complete
2. Installing Discworld-TinTin Package
- Download this repository (git clone or download a tarball)
- Requirements for use:
- tmux and tmuxp (sudo apt install tmux tmuxp)
- python 3
- sqlite 3
- With package downloaded and requirements installed then
tt++ -G config.tinwill launch - "Discworld" shell-file exists to setup tmux layout or connect to existing
- Recommend symlinking e.g. (`sudo ln -s /home/myuser/discworld-tintin/Discworld /usr/local/bin/disc)
- Now you can type "disc" from anywhere to launch or connect to the setup
Configuring the MUD
Columns Configuration
In order for lengthier triggers to catch you need to play with cols 999 configured on the MUD to avoid line-breaks. This has the consequence of making many of the "formatted output" commands on the MUD look terrible (e.g. who or skills).
Because of this there are a number of aliases defined (in src/aliases.tin) that send cols 60, then the command, then cols 999 the the MUD so you get pretty output but then revert back to full-length lines.
Commands that resize output before running:
skillsspeakandlanguageandlanguagesspellsritualsgroup statuswhohelpnickname
ASCII Map Location
You must force the MUD to show the ASCII map above look/glance output, use the following commands to configure this properly:
options output map glance = topoptions output map glancecity = topoptions output map look = topoptions output map lookcity = top
Features
Speedwalking and Room/NPC/Item Search
- Files:
src/db.tin(src/maproute.py,src/quow.db)
A suite of commands for interacting with Quow's database of DiscworldMUD rooms, npcs, items and more. This allows for generating a SPEEDWALK route from your current location to a given result, if possible. Many of the output options from these commands are CLICKABLE with left-mouse if you prefer that to typing out the appropriate followup command.
As a quick example typing db room Mended Drum {am} will search for rooms whose short names contain Mended Drum and are in Ankh-Morpork (see filtering) and display up to 10 results. To speedwalk to one of the results you would click on it or type db route [0-9] where [0-9] is the numeric index of the returned results you want to target (see screenshots and deeper explanation below). Finally type (or click on) speedwalk to begin moving towards that location. Note that *all searches are case-sensitive meaning "mended drum" is not the same as "Mended Drum".
There's also a bookmarks feature to store frequently visited rooms for quick route generation.
Get help with using these commands directly within TinTin++ by typing db help.
Room Search
Search for a room in the MUD by name. The name of a room is what you see when you glance (or look with shortinlong=on option enabled), for example The north end of Short Street outside the Mended Drum or The Job Market centre. Lets imagine we want to speedwalk from our current location to the "launder room" inside of the Ankh-Morpork theives guild to repair equipment.
First, we'd search for the room by name:
db room launder
This would return all matching rooms (of which there are two). Note you could search for rooms specifically in Ankh-Morpork (or elsewhere) by using a filter. The results of db room launder will look like this:
Results for rooms matching "launder".
  [0]: launder room (inside) found in AM Thieves
  [1]: launder room (inside) found in Genua Sewers
Generate a walking path with "db route #" or *clicking* the number or name of one of the results above.
From here if we want to speedwalk to one of the results simply left-mouse click on one of the numbers (0 for AM, 1 for Genua) or room names ("launder room (inside)") to generate a route, or type db route 0 to generate a route to the first result or any other. If a route is able to be generated a message will display showing the total # of steps and will set the speedwalk alias. The message will look like:
[speedwalk] Generating speedwalk from current location to launder room, AM Thieves...
[speedwalk] A route was found, type "speedwalk" to fast travel. [140 steps]
Now simply type speedwalk or left mouse-click on "speedwalk" to begin moving towards the AM launder room.
NPC Search
Search for an NPC in the MUD by name. Let's imagine we want to locate a "villager" NPC and speedwalk to it from our current location.
First, we'd search for NPCs matching "villager":
db npc villager
This would return up to 10 matching NPCs. Note you could search for NPCs in specific areas by using a filter. The results of db npc villager will look like this:
Results for NPCs matching "villager".
  [0]: villager [Hillshire] found in road running through Hillshire, Sto Plains Region
  [1]: bumpkin, local, oaf, peasant, villager, yokel found in commercial side street, Slippery Hollow
  [2]: villager found in western edge of the square, Bois
  [3]: Sheepridge villager found in Sheepridge village square, Sto Plains Region
  [4]: villager found in cobbled road in Blackglass, Uberwald Region
  [5]: villager [ramtop villages] found in road outside of Brass Neck, Ramtops Regions
  [6]: villager [Blackglass] found in cobbled road in Blackglass, Uberwald Region
Generate a walking path with "db route #" or *clicking* the number or name of one of the results above.
From here if we want to speedwalk to one of the results simply left-mouse click on one of the numbers (0 for Hillshire, 5 for Brass Neck) or NPC names ("Sheepridge villager") to generate a route, or type db route 0 to generate a route to the first result or any other. If a route is able to be generated a message will display showing the total # of steps and will set the speedwalk alias. The message will look like:
[speedwalk] Generating speedwalk from current location to dark alley, Sto Plains Region...
[speedwalk] A route was found, type "speedwalk" to fast travel. [123 steps]
Now simply type speedwalk or left mouse-click on "speedwalk" to begin moving towards the desired villager.
NPC Inventory Search
Search for an item in NPC inventories by name. Let's imagine we want to locate a "white Djelian loincloth" for a Mr Werks delivery mission, and we want to find it on an NPC so we don't have to pay for it...
First, we'd search for the item in NPC inventories by name:
db npcitem white Djelian loincloth
This would return up to 10 matching NPCs who are known to have this item. Note you could search in specific areas using a filter. The results of db npcitem white Djelian loincloth will look like this:
Results for NPC items matching "white Djelian loincl":
  [0]: white Djelian loincloth found on palace guard in Square of Ancestors, Djelibeybi
Generate a walking path with "db route #" or *clicking* the number or name of one of the results above.
From here if we want to speedwalk to one of the results simply left mouse-click on one of the numbers or names in the result output to generate a route, or type db route # to generate a route to a specific result (0-9). If a route is able to be generated a message will display showing the total # of steps and will set the speedwalk alias. The message will look like:
[speedwalk] Generating speedwalk from current location to Square of Ancestors, Djelibeybi...
[speedwalk] A route was found, type "speedwalk" to fast travel. [8 steps]
Now simply type speedwalk or left mouse-click on "speedwalk" to begin moving towards the desired villager.
Vendor Item Search
Search for an item sold in shops or by vendor NPCs by name. Let's imagine we need a sword to swing, so we want to find a shop that sells swords.
First, we'd search for the item by name:
db item sword
This would return up to 10 matching items found in shop or vendor lists. Note you could search in specific areas (AM, BP, DJB) using a filter. The results of db item sword will look like this:
Results for items matching "sword":
  [0]: bastard sword (20Rh 100s) found in illegal contraband stall, Bes Pelargic
  [1]: double-edged broad sword (A$112.50) found in weapon shop, Ankh-Morpork
  [2]: watered-steel long sword (A$180) found in weapon shop, Ankh-Morpork
  [3]: rose-hilted long sword (A$180) found in weapon shop, Ankh-Morpork
  [4]: heavy sword [build-a-bear] (8Rh 60s) found in Assemble an Animal Workshop, Bes Pelargic
  [5]: short sword [build-a-bear] (8Rh 60s) found in Assemble an Animal Workshop, Bes Pelargic
  [6]: swordfish (DjToon 7.75) found in smelly fish stall, Djelibeybi
  [7]: sword necklace (A$4.25) found in Rainbow Homeopaths Incorporated, Ankh-Morpork
  [8]: long sword (A$3) found in Follatt Biraten's pawn shop, Ankh-Morpork
  [9]: swordfish (S8|84de) found in seafood-scented edge of the Harbour Market, Ephebe
Generate a walking path with "db route #" or *clicking* the number or name of one of the results above.
From here if we want to speedwalk to one of the results simply left mouse-click on one of the numbers or item names in the result output to generate a route, or type db route # to generate a route to a specific result (0-9). If a route is able to be generated a message will display showing the total # of steps and will set the speedwalk alias. The message will look like:
[speedwalk] Generating speedwalk from current location to weapon shop, Ankh-Morpork...
[speedwalk] A route was found, type "speedwalk" to fast travel. [136 steps]
Now simply type speedwalk or left mouse-click on "speedwalk" to begin moving towards the shop with the sword you want.
Gatherable Item Search
Search for gatherable items like spices by name. Let's imagine we need to find some Thyme to complete a spiced sausage mission.
First, we'd search for a gatherable item by name:
db gatherable thyme
This would return up to 10 matching locations where thyme can be gathered. Note you could search in specific areas using a filter. The results of db gatherable thyme will look like this:
Results for gatherables matching "thyme":
  [0]: some thyme found in garden, Bes Pelargic
  [1]: some thyme found in kitchen garden of the Beard and Badger,
  [2]: some thyme found in bottom part of the Temple gardens, Temple of Small Gods
  [3]: some thyme found in conservatory, BP Estates
  [4]: some thyme found in neat herb garden, Ramtops Regions
  [5]: some thyme found in service entrance to the Chronides farmstead, Klatchian Farmsteads
  [6]: some thyme found in northeast garden, Sto Plains Region
  [7]: some thyme found in garden, Ramtops Regions
  [8]: some thyme found in cottage herb garden, Ramtops Regions
  [9]: some thyme found in cosy kitchen hut,
Generate a walking path with "db route #" or *clicking* the number or name of one of the results above.
From here if we want to speedwalk to one of these places simply left mouse-click on one of the names or numbers in the output or type db route # to generate a route to a specific result (0-9). If a route is able to be generated a message will display showing the total # of steps and will set the speedwalk alias. The message will look like:
[speedwalk] Generating speedwalk from current location to service entrance to the Chronides farmstead, Klatchian Farmsteads...
[speedwalk] A route was found, type "speedwalk" to fast travel. [24 steps]
Now simply type speedwalk or left mouse-click on "speedwalk" to begin moving towards the room where you can gather.
Filtering Search by Region
All of the database (db) search commands described above can have their results limited to a specific region or city of the Discworld by including a filtering clause at the end of the command wrapped in curly-braces.
Some examples of this:
db room Mended {am}would search for rooms with "Mended" in the name only in Ankh-Morporkdb item sword {ephebe}would search for swords for sale only in Ephebedb gatherable thyme {bes pelargic}would search for thyme in Bes Pelargic
The valid filter options are as follows:
amorankh-morporkdjbordjelibeybigenuastoorsto plainsbporbes pelargicepheberamtopssto-lat
Bookmark System
Some rooms are visited frequently enough that it becomes a burden to search for them each time, for this we can use the bookmark system.
When in a room you'd like to bookmark, you can do so with db bookmark add here. This will show you a message like:
[speedwalk] Added a new bookmark for "Magic and Meddlers' Shop" in House of Magic - Creel (inside).
You can list all saved bookmarks with db bookmark list, which will print a list of your saved bookmarks like so:
[speedwalk] Speedwalk Saved Bookmarks:
  [0]: Room "junction of the Avenue of the Pharaohs, Market Street and Phoenix Road" in Djelibeybi (outside).
  [1]: Room "north end of Short Street outside the Mended Drum" in Ankh-Morpork (outside).
  [2]: Room "beer room" in Ankh-Morpork (inside).
  [3]: Room "Magic and Meddlers' Shop" in House of Magic - Creel (inside).
Generate a route to a listed bookmark by clicking on the number or room name (e.g. "2" or "beer room"), or typing db bookmark route #, this will show an output like:
[speedwalk] Generating speedwalk from current location to specified room.
[speedwalk] A route was found, type speedwalk to fast travel. [190 steps]
Now simply type speedwalk or left mouse-click on speedwalk to begin moving towards the specified room.
Information about these commands can be viewed within TinTin++ by typing db bookmark help.
Updating Database
All room, item, npc and route data comes from Quow's database, which lives at src/quow.db. The latest version of this database can be pulled from Quow's MUSHClient packages at any time replace the existing file.
Map Door Text Parsing
- Files:
src/mdtparse.py(src/gmcp.tin,src/mdt_matchcontrol.py,mdtconfig.json,logs/features/mdt_custom_matches.json)
Show what living things are in adjacent rooms that you have visibility into. Parses the prose sent by the game into a more easily readable format, sorts by most populated room first.

MDT Configuration
The mdtconfig.json file in the root of this package contains the baseline configuration. Things like "rats,cats,dogs,clouds" being worth 0 points, or "bodyguards" and "hoplites" being coloured orange. Make changes here you want to persist forever, assigning different point values to high-xp or good loot targets or mission item carriers like the "town crier". As this work is a blatant copy of Quow's excellent MUSHClient plugin, the file format for the configuration is identical.
Temporary Targets
Sometimes it's useful to add a high-value target temporarily to the MDT configuration. Maybe you're looking for "poets" to deliver a letter to or an "Agatean ambassador" for a gold-trimmed obi delivery, or the pickpocket that robbed you earlier, this is possible with the mdtc commands (map-door-text-custom).
Use mdtc add <pattern> to quickly add a NPC with a 5-point value and coloured red (e.g. mdtc add Agatean ambassador).
Once you've tracked one down, use mdt remove <pattern> to remove it (e.g. mdtc remove Agatean ambassador).
These custom matches are stored in their own file (logs/features/mdt_custom_matches.json) so there's no risk of removing entries from your baseline configuration file, only those you've added specifically with the mdtc add command as described above.
MDT Window and Implementation Reference
The default tmux layout places a Map Door Text output window above the main game window and below the chat log.
This pane runs the bin/mdt script which takes the raw log of map-door-text data that comes from GMCP and passes it to the src/mdtparse.py script to transform the output, then refreshes itself every half a second. The src/mdt_matchcontrol.py contains a few simple methods for the TinTin++ aliases to invoke to manipulate the logs/features/mdt_custom_matches.json file where temporary targets from mdtc add <pattern> are stored.
Mission Cooldown Timers
- File:
src/missions.tin(src/missions/sailing.tin,src/missions/jobmarket.tin,src/missions/letters.tin,src/missions/sausages.tin)
The mission cooldown functionality will track when you can do missions again across multiple characters for many of the repeatable missions available on DiscworldMUD.

This system currently supports the following missions:
- All AM Job Market missions (Mr Werks)
- All Dead Letter Office jobs (Frank)
- Easy and Hard Sausage Jobs (Sam Slager)
- Sailing Missions (Chidder/Smith)
You can get instructions on using this system from within TinTin++ with the missions help command.
Missions Cooldown Report
Using the missions command will report all currently tracked mission timers for all characters, as seen in the screenshot above.
Timed Alerts
When a cooldown for a mission has ended, a coloured alert will be displayed on screen to inform you:

Save Across Restarts
Mission timers (like spottimers) are saved to file every five minutes so that if you must restart your client you can restore your current mission timers and alerts afterwards.
Use the mtload command to restore the latest snapshot from the filesystem. You can use the mtsave command to force a save before restarting.
Chat and Talker Logging
- File:
src/channels.tin
The client will capture messages sent in tells, group say, talker channels, club badges as well as the (newbie) talker and others, and log them to file. This file can be displayed in a tmux pane to have a scrollable chat-history log as seen in the opening screenshot.

Adding New Channels / Clubs
In the src/channels.tin file you'll see examples for capturing Clubs and Talker channel chatter. You probably don't belong to my clubs so you can safely remove lines like the one for (They Might Be Alts) and add your own. Even the guild-level talkers are not all accounted for, but you can use my examples for (WIzards) or (Thieves) to add whatever you need.
Talker Channel Logging
By default messages on talker channels aren't logged to file by default, they can be noisy and often meaningless. However when there is an interesting conversation happening then logging to the chat file is useful.
You can enable logging talker messages to the chat file with talker log on and stop logging talker messages with talker log off. If you'd like talker mesages to log by default unless/until you turn them off, simply change #variable {talker_log_toggle} {0}; line in src/channels.tin to #varaible {talker_log_toggle} {1};.
Log File and Window Display
All logged chat and talker messages are stored in logs/chat.log which can be tailed in a tmux pane as seen in the default layout.
Session Logging
The entire TinTin++ session is logged to file every time you play, with a single log file per calendar day stored in the logs/active folder. This functionality is configured in the config.tin file.
I occasionally go into this folder and compress historical logs from previous years into an archive to save data.
Mindspace Calculator
Many of the most useful features of Quow's mindspace plugin have been converted to TinTin++ and are available for use. This tracks your skills and spells-in-mind across multiple characters.
Spells Output and Gained/Lost
When you type spells to list the spells your character has in their head, each spell will be captured and stored against the characters name so that in the future we can show what spells you've gained or lost since last time (e.g. if you die and forget some spells).
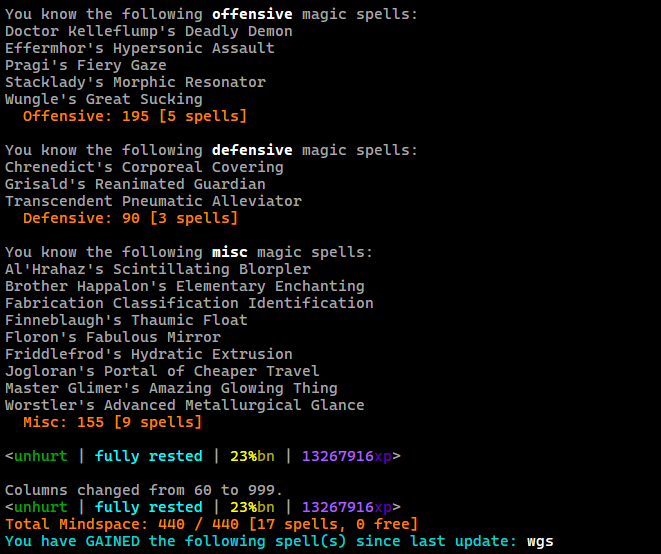
The client will also calculate the amount of mindspace used by spells both in total and per-category and report. Will also report how much mindspace you still have free for new spells if any, assuming you've run mindspace skills as described next.
Mindspace Skills Ingestion
Run the mindspace skills command to have the MUD output all your spell-related skill bonuses and your raw magic.spells.special bonus to calculate your mindspace and empower spellcheck results when looking up spells as described next.
After the MUD outputs your skills the client will report back that it has set your characters total mindspace available:
Mindspace max set to 440 (raw bonus + 30).
Spellcheck and Spell Lookup
You can lookup any spell by its acronym to find details about the spell, including:
- Mindspace and GP Cost
- Spell Category
- Spellbook and Location
- Components used and consumed
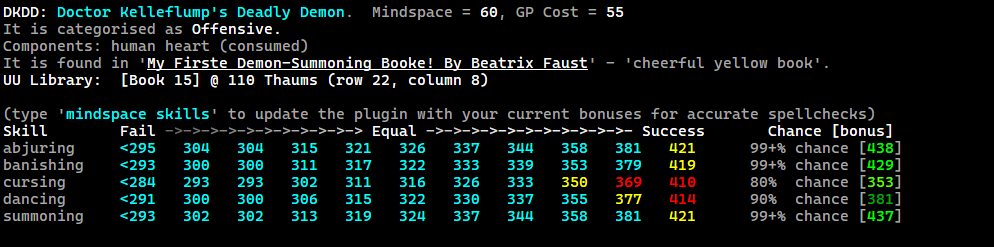
If you've ingested your skills with mindspace skills as described here then looking up a spell will also compare your skills to those needed to cast the spell and provide a spellcheck table as seen in the image above.
Spellbook Detail
When looking up a spells details you can left-mouse click on the title of the Book that spell is found in to get a list of other spells that are in that same book.
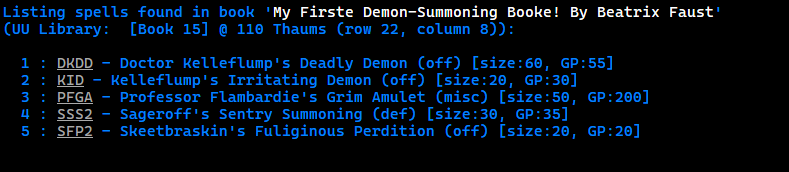
Clicking the acronym / nickname of any of the listed spells will show spell details for that spell.
Orders Primaries Tracking
When possible your characters wizardly order is tracked and skills that are primaries will be labeled as such in the spellcheck output.
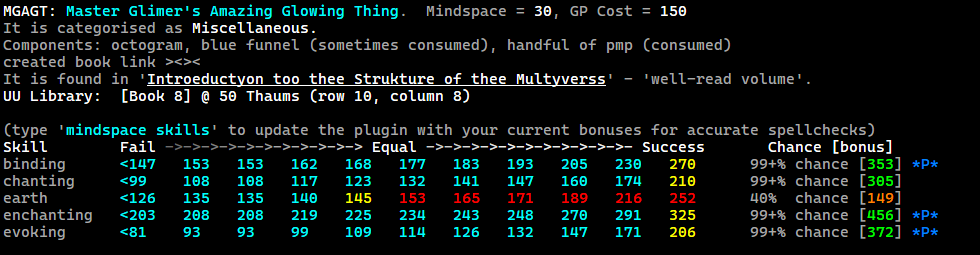
In the above example as a Seer I get binding, enchanting and evoking as Primary Skills, hence the *P* designation.
Sailing Mission Helpers
- File:
src/missions/sailing.tin
The sailing helper includes a number of useful trackers, colour highlights and alerts for sailors.
Cooldown Tracking
Sailing is tracked like other missions with alerts and a report to track sailing cooldown for multiple characters, see mission cooldown timers for more.
Per-Mission XP and Duration Report
The total amount of time the sailing mission took and the total earned experience points are tracked each time you get on the boat. This information is automatically printed out when you land at port, and can be viewed again afterwards with the sailreport command:
[sail] Sailing Report: 655406 xp earned in 33 minutes and 58 second(s).
You can also share these details with your group using the gssail command.
Stage Tracking
Detects when you transition between phases of the sailing mission and reports these transitions to you (e.g. calm, hail, fog, lightning, gale).
[sail] ### Hail Stage Begins ###
[sail] ### Calm Stage Begins ###
[sail] ### Gale Stage Begins ###
Sail Colour Highlights
Many important lines throughout the sailing missions are coloured to draw your attention to them, some of which include:
- Monster appearing (kraken or serpent) and leaving
- Ship begins moving or halts
- Overboard when dragged by rope or swimming along
- Serpent lunging, Kraken coiling, etc
- Fires in adjacent rooms or currnet room
- Ice and seaweed interactions
- Boiler engine dial output
- Dragon hunger/boredom levels and toy/food interactions
- Tying yourself, others, crates
- Frayed levels of ropes you look at
- Caught in forward/backwards current
- Caught in whirlpool
- Knocked or gusted off-course
- Sextant star/sun highlights
Group Features
- File:
src/group.tin
A number of features related to grouping to track group member shield status and recall where floaters have dropped, or weapons were snatched by muggers etc.
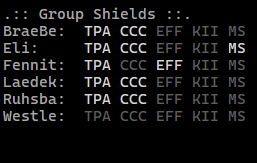
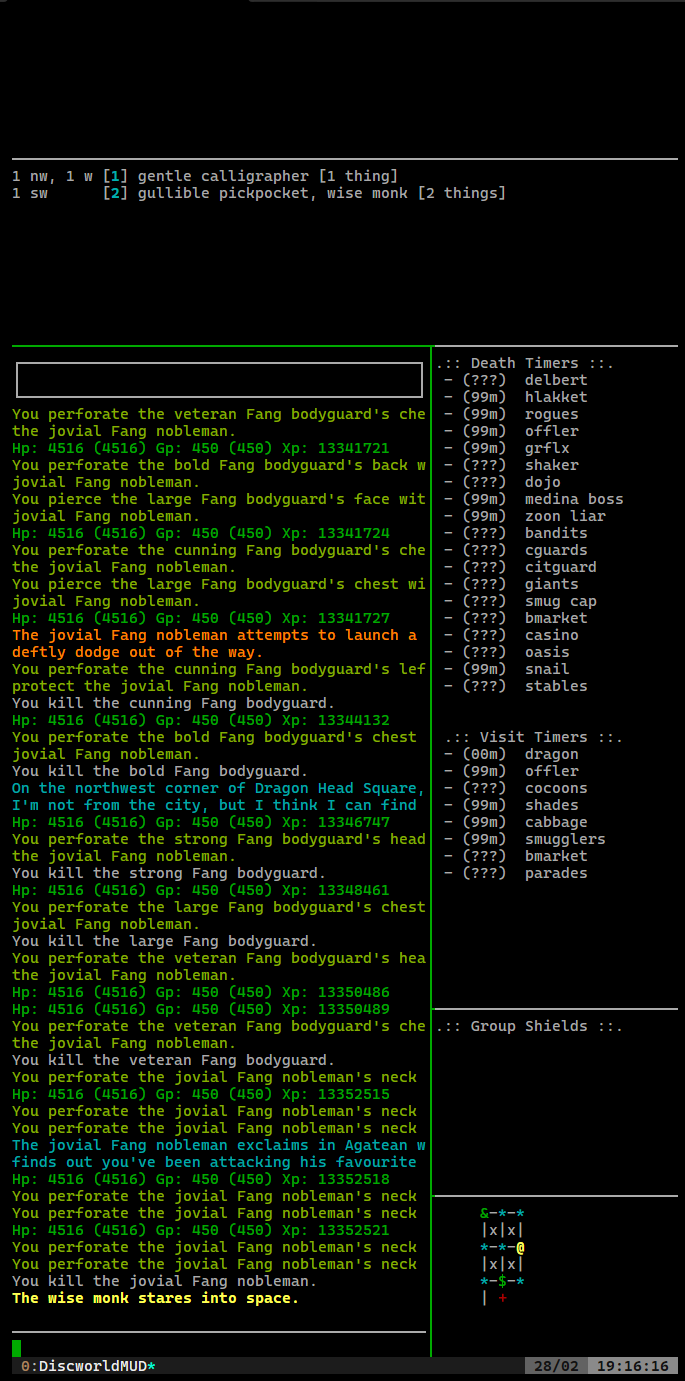
Group Shield Monitor
Tracks the status of your shields and group members shields in "real-time", accounting for TPA, MKII, EFF, GSHG, CCC and MS. Both EFF and GSHG (the witches Household Guard equivalent) are tracked together under the EFF label.
TODO: need a good group shields window screenshot
Commands
The following commands are available:
sgs(show group shields) will display a grid of group mates and shields (like the screenshot above)rgs(reset group shields) will clear all data and rungroup shieldsto refresh itself
Window / Display File
The output you'd see when using the sgs (show group shields) command is also written to a file every time a shield update is processed at /logs/groupshields.log. You can use the shell script at bin/grp to display this file in a window. The default tmux configuration that comes with this package does this already.
TPA and EFF Alerts
For TPA anytime yours or a groupmates breaks the output line from the MUD will be coloured brightly, logged to the chat window and a terminal bell will be rung.
For EFF the same colouring, chat logging and terminal bell will happen, however you can disable terminal bells for others EFF drops (not yours) with gs eff off, and re-enable it with gs eff on - this is not a persistent setting, alerts will default to on each session.
Group EFF Drop Tracker
When a groupmates EFF fell down and no one noticed you can help them find it with the gseff command to report to group chat the location where we last registered a EFF fall out of orbit.
[kf] Ruhsbaar: [eff] Deramius's floating "the black iron shield" was dropped in {on the surface of a large pond}
Group Weapon Snatch Tracker
When a groupmate has their weapon snatched by a Shades mugger or otherwise you can help them find out who exactly stole it with the gssnatch command to report to group chat the details of the last weapon-snatch we've seen.
[/dev/nli] Ruhsbaar: [snatch] Goody Gnicky's "a bronze javelin" was stolen by {scary mugger (hiding)}
XP Tracker
The amount of experience you've earned total is tracked for the length of the TinTin++ session (and optionally for smaller windows as explained below). It tracks properly through SUs/character switching and is displayed in the prompt bar and can be reported to the group with the gsxp command.
[kadfja] Ruhsbaar: 21,860xp in 0h 2m (655k/h)
You can view a report of XP earned and rate for the current window and entire session with the xpreport command:
=><= XP Report =><=
Window: 21,737xp total in 0h 1m @ 1,304k/h
Session: 1,412,414xp total in 7h 24m @ 190k/h
Windows
When hunting it can be useful to track the XP earned and rate from when you started leading, on top of the overall session. This can be accomplished by starting a new "tracking window" with the xpreset command. Using this will start a new timer and begin tracking XP exclusively since it began, changing what's shown in the prompt and what's reported with the gsxp command.
For example say I was 7 hours into my play session so my prompt bar showed 1,389,768xp in 7h 13m (192k/h), I could enter xpreset and it would then show 0xp in 0h 0m (0k/h) ready to start tracking anew from that moment on.
Regardless of how many times you xpreset the total gains for the session are always tracked seperately and can be reported with gsxp all
Commands
A few commands are available for interfacing with the XP tracker:
xpresetto start a new tracking windowxpreportto show yourself the XP gained and rate for current window and entire sessiongsxpto report current window xp rate to the groupgsxp allto report current window and whole session xp rate to the group
Hotspot Timers
- File:
src/spottimers.tin(src/gmcp.tin)
Tracks the time since you've last seen an NPC die or visited a room based on a list configured in src/spottimers.tin. You can adjust the room-ids or NPC name patterns to track in the top of that file. You can display the current state of timers with the dt command, or display them in a tmux pane.
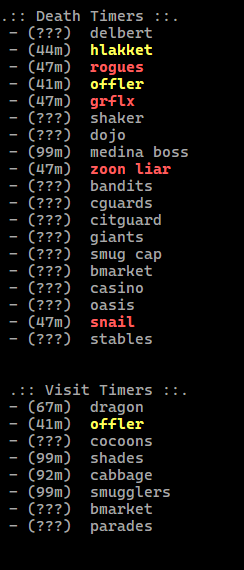
Window / File Display
One of the tmux panes in the standard layout is set to run bin/dt which outputs the contents of logs/xptimers.log which holds the same contents as you'd see from typing dt.
Reset Spots
Sometimes your timers are stale or old and need to be reset.
Reset A Spot
The other group beat you to it, shame on you, but you still need to track a spot like it was just killed. Pass the display name of the spot to the dtreset command to set it as if it were just killed/visited.
Examples:
dtreset delbertdtreset zoon liardtreset bmarket
Reset All Spots
If you gave up hunting a while to reset your heartbeat and all your spottimers are old or stale you can reset all spots to their unseen state as if you'd just booted up using dtreset all.
Sync With Others
When hunting with other folks who use discworld-tintin (or my MUSHClient hotspot timer plugin) can sync timers between each others clients via tell by using the dtsync <playername> command. For example if I want to send my hotspot timers to Ruhsbaar because he just joined the group I can do dtsync Ruhsbaar to send them over.
Share With Group
You can display a snapshot of your hotspot timers to group chat using the gsdt command (group-say-death-timers).
[adgfj] Ruhsbaar: hlakket: 06m | rogues: 08m | offler: 03m | grflx: 08m | medina boss: 99m | zoon liar: 08m | dragon: 28m | offler: 03m | shades: 99m | cabbage: 53m | smugglers: 99m |
Colouring
Each spot defined in the configuration file is given a respawn value which is meant to be an integer number of minutes. Ten minutes before and five minutes after the specified time the spot will show as yellow colour, then show as red for up to twenty minutes after that, and back to normal color.
For example if I say a spot is going to respawn in 60 minutes - and then go kill it:
- After 50 minutes (60 - 10) it will show as yellow
- After 65 minutes (60 + 5) it will show as red
- After 80 minutes (60 + 20) it will go back to grey
Save Across Restarts
Every five minutes, and anytime the client is either disconnected from the MUD or quit from, the state of your hotspot timers are saved to a file. When reloading TinTin++ you can use the dtload command to load them from file so you don't lose your timers. You can force a save to file before restarting with the dtsave command.
TinTin Prompt Bar
- Files:
src/prompt.tin(src/xpmonitor.tin,src/tpamonitor.tin,src/quota.tin)
The prompt bar is the #split box drawn at the top of the TinTin++ window, used to display all sorts of meaningful information for your current DiscworldMUD session.

TPA Monitor
The first section of the prompt bar monitors your characters current TPA (Transcendent Pneumatic Alleviator) shield status. If you have a TPA active it will show "TPA" in white letters (updated when cast, or by the output of shields or group shields). As your TPA shield takes damage, the colouring of the "TPA" indicator in the prompt bar will update to give you a real-time understanding of the state of your shield. It will turn dull-red, bright-red, orange and yellow as appropriate.
If your shield actually breaks the message will be highlighted as bold red and underlined, logged to the chat window and the prompt-bar indicator will disappear until re-cast. The client also tracks the length of your TPA - the number of minutes between it being cast and breaking - this will be outputted above the shield-break line as shown below.

Experience Gain Display
The next section of the prompt bar will show how long the session has been running (or time since the last xpreset), the total XP earned during that time and your XP-per-hour rate.
For example: 1,207,957xp in 2h 41m (450k/h) telling me it's been 2h 41m since I logged in (or last used xpreset), in that time I've earned 1,207,957xp total, which calculates out to about 450,000xp per hour.
For more information on XP gain tracking, using xpreset, sharing the rate with the group and other options see the XP Tracker section.
Thief Quota Timer
If your current character is a thief from Ankh-Morpork and you've run read quota brief the Thief Quota Helper will kick in to track your remaining quota period and more, see that section for details.
The time you have left on your quota period will be displayed in the prompt bar, and color magenta when you're an hour or less away from flipping over.

Current Local Time
Finally to the very right-hand side of the prompt bar the system time will be displayed in 12-hour am/pm format.
Thief Quota Helper
- Files:
src/quota.tin
The quota helper reads the output of read quota brief to track the time left until your quota flips over and calculate a A$ value left to steal to hit quota maximum. I recommend adding read quota brief to your .afterinventory alias in-game so that anytime you login as or SU to a thief character you'll be automatically set to track.
Left to Steal Calculation
When you read quota brief an extra line will be added to tell you how much more you can steal before hitting your maximum.
Inventory regeneration complete.
  Receipts received: A$137.50.
  Guild cut: A$41.25.
  Amount paid: A$0.
  Amount owed: A$41.25.
  Time left: 4 hours, 19 minutes, 41 seconds.
  Min quota: A$53.
  Left To Steal: A$174.500000  <---- this one
  Max quota: A$312.
  Max left to steal: A$174.50.
You briefly consult the brown leather Thieves' Guild licence.
Quota Flip Alerts
Once the client is tracking your remaining quota time from read quota brief it sets alerts to remind you an hour, half an hour and ten minutes before your quota flips over, and again when it resets, like so:

These alerts are enabled-by-default on client start, but can be turned off for the session using quota alert off (and turned on again with quota alert on).
Prompt Bar Timer
A countdown of time left until your quota flips will be displayed in the prompt bar.
Other Colour Highlights and Triggers
- Combat highlighting
- Specials (incoming/outgoing/other)
- Backstabs
- Base attack rounds
- Magic highlighting
- Delude levels and deepens/fade messages
- Item enchantment levels
- Background magic levels
- Pragi fire damage percentages
- Beautified spell casting
- Coloured FCI output
- Library and distortion highlights
- Contemplate colouring
- Djinn weapon invoke colouring
- Balsa wand zapping
- TPA and EFF drops
- Travelling shop materializing
- Incident highlighting
- Weapon snatches and snatched weapon drops
- Rumbling JPCT doors
- You and others fumbling inventory items
- Tossed by stone giants
countcommand highlighting- Gemcutting highlights
- Shelox fight highlights
- Copperhead mines highlights
- Crate game colouring
- Gem vein wall assess colouring
- Purple mineral powder pannning colouring
- Dampgas bell alerts and highlighting
Tmux Setup
The "Discworld" shell script either creates a new or attaches to an existing tmux session named discworld. When creating a session it uses tmuxp to create the layout and run initial commands for each pane. The layout definition for tmuxp is in the discworld.yaml file.
I recommend sym-linking the Discworld script to some place in your $PATH as 'disc' so that at anytime you can type disc into a terminal and create or take-over your DiscworldMUD session, for example:
sudo ln -s /home/myuser/discworld-tintin/Discworld /usr/bin/disc
Toggle Full or Mobile View
When connected via mobile device its convenient to collapse the right-hand side bar, hiding the spot-timers, group shields and minimap panes to view the MUD full-width when in portrait orientation. The Discworld script configures two key bindings to quickly make this adjustment:
<leader>Ctrl-F- toggle to full-view (sidebar visible)<leader>Ctrl-G- toggle to mobile-view (sidebar collapsed)
Here's an example of full-view on mobile:
And the collapsed view on mobile:
Mouse Support
The latest versions of TinTin++ have expanded mouse support, which has been implemented in the following ways.
Scrolling Buffer
The buffer or backlog of output from the MUD is now controlled by TinTin++ and not Tmux, as such scrolling up or down with the mouse-wheel will be picked up by TinTin++ and move your view of the buffer up or down by five lines at a time.
Input Bar
The input bar can be left-click in with the mouse to set the position of the cursor for editing.
Clickable Links
The MSLP protocol is used to create clickable links in the output to send further commands. This is used throughout the database search and mindspace functionality.
Command Reference
A condensed listing of all the commands/aliases that this setup provides.
XP Tracker Commands
xpreset- reset xp rate and start new windowxpreport- report current window and whole session XPgsxp- report current xp gains and rate to groupgsxp all- report current and whole session XP rate to group
Hotspot Timer Commands
dt- show spot timers reportdt help- show spot tiemrs help filedtreset <all/spot name>- reset all spots or a particular spotdtsave- save hotspot timers to filedtload- load hotspot timers from filegsdt- report hotspot timers to group
Mission Commands
missions- show active mission timers for all charactersmissions help- show missions help filegssail- report last sail length and XP to groupsailreport- show sailing reportmtsave- save mission timers to filemtload- load mission timers from file
Group Commands
rgs- reset group shields datasgs- show group shields reportgs eff <on/off>- enable or disable groupmate EFF drop alertsgssnatch- report last seen weapon snatch to groupgseff- report last seen EFF drop to groupgssail- report last sail length and XP to groupgsdt- report hotspot timers to groupgsxp- report current xp gains and rate to groupgsxp all- report current and whole session XP rate to group
Database Search and Speedwalk Commands
db gatherable <query>- search for gatherable itemsdb npc <query>- search for npcsdb npcitem <query>- search npc inventories for itemdb item <query>- search for a sold itemdb room <query>- search for a room by namedb route <#>- route to a search query resultdb route <roomid>- route to a room by idspeedwalk- run the speedwalk alias (after routing)db- points todb helpdb help- show database command helpfiledb bookmark help- show bookmark room helpfiledb bookmark list- show list of saved / bookmarked roomsdb bookmark add here- add current room to bookmark listdb bookmark remove <#>- remove a saved bookmarkdb bookmark r oute <#>- route to a saved bookmark room
Talker and Chat Commands
talker log on- enable logging talker messages to chat windowtalker log off- disable logging talker messages to chat log
Mindspace Commands
mindspace skills- capture skills for this character for spellcheck/mindspacemindspace help- show mindspace help filemindspace <spell acronym>- show spell detail and spellcheck for a spell (e.g. "jpct")spells- report free mindspace and spells gained/lost
Quota Alert Commands
quota alert <on/off>- turn quota flip reminders on or off
Map Door Text Commands
mdtc add <pattern>- add a temporary map-door-text matchmdtc remove <pattern>- remove a temporary map-door-text match
Utility Commands
sotp- catches misspelling ofstop, sendsstopcolourpalette- shows all <rgb> colors possible with tt++minesolve %1 %2 %3- calculates how many hammer chips/pickaxe strikes to mine a gem vein in copperheaddebug <on/off>- show GMCP messages in output for debugging
Sizing Commands
setsize- sets rows to 300 and cols to 999
The following commands set cols to 60, send the command to the MUD, then resize to cols 999
skillsspeak/language/languagesspellsritualsgroup statuswhohelpnickname
Credits
I've spent a lot of time and effort on this setup to make it "perfect" for my use and the contents herein have all been touched by or modified by me in some way if not created outright, but I've been inspired by and blatantly taken bits from some folks in particular:
Quow
You don't play the game without knowing Quow and his outstanding work on his MUSHClient plugins for the game, which are far-and-away the most advanced. If you don't have a reason to use TinTin++ you should really go use his setup instead available at http://quow.co.uk.
The "map door text" parsing, "speedwalking" and database search, and "mindspace" functionality present in this repository are nothing more than tintin++/python ports of Quows work.
Oki
I've never even met Oki in game, but I stumbled upon their repository of TinTin++ scripts some time ago and happily copied some of their magic/combat substitutions and quota triggers. You can find Oki's repository here: https://git.tubul.net/richard/tt_dw.git
Dilbo and Kiki
The player Dilbo shared a bunch of Sailing highlights with me that I believe were taken from the player Kiki's MUSHClient sailing plugin, so thanks to both of them!
Disclaimer
The files in this repository were put together for my own personal use and come with no guarantee to work for you or your fairy godmother. I provide these files "as-is" and any content herein that is my own is released under the terms and conditions of the GNU Affero General Public Licence v3.0.
If you need help getting setup, have questions about how things work, feature request, etc - feel free to reach out to me in game and I'm happy to discuss, but make no promises whatsoever.
Happy MUDing <3